Build Stronger Bones After 55: The Three Impact Exercises to Start With Today

Ollie - Be Mobile Physiotherapy
Ollie is a physiotherapist at Be Mobile, passionate about changing society's misconception that older adults shouldn't lift weights. He writes most of our articles on strength, balance and confidence for the 55+ community.
Read Ollie's full bio →


A practical guide from the Be Mobile Physiotherapy team on why your bones need impact to grow stronger, and the three levels to work through safely at home.
Maybe you've been told your bone density isn't quite what it used to be.
Perhaps it came from a scan you almost didn't bother having. Perhaps a friend broke a wrist on an ordinary footpath and it's stayed with you ever since. Or perhaps you've quietly started moving more carefully this past year, taking the stairs a little slower, holding the rail a little tighter, without ever really deciding to.
That's a very understandable place to be. Almost everyone responds to a bone density result the same way, by treating their skeleton as something fragile that needs protecting.
Here's what we want you to know straight away. Your bones are living tissue, rebuilt every single day of your life, and the thing that tells them to build is load. Take the load away and the building slows right down.
The safest thing you can do for weakening bones is give them a reason to get stronger.
Let's break it down. First, why gentle exercise on its own won't get you there.
Why Walking and Swimming Aren't Enough on Their Own
There's a lot to like about walking and swimming. They're kind to sore joints, they're good for your heart, and they get you out of the house. Keep doing them.
They just won't build much bone. Swimming takes gravity out of the picture almost entirely, and walking loads your skeleton in a way it has known since you were a toddler. Neither one gives your bones anything they'd call news.
That's the distinction worth holding onto. Your bones respond to load that is higher than what they're used to, and impact is the simplest way to deliver it.
Your Bones Are Always Listening
This comes down to a rule called Wolff's Law. Your bones adapt to the loads placed on them. Load them more, they build. Load them less, they let go of what they're not using.
Here's what actually happens when you land:
- You drop your heels or land from a small jump, and a shock wave travels up from your feet.
- It moves through your shin bones, your thigh bones, and up into your hips and spine.
- The cells inside those bones sense the stress and read it as a message: the forces around here are higher than usual.
- Bone-building cells called osteoblasts get to work, laying down fresh minerals and making the bone thicker and denser.
We think of it as a construction crew that only shows up when it's called. Impact is the call. Avoid impact altogether and the crew never gets the message, so nothing gets built.
That thud you hear when your heels hit the floor is your skeleton's instruction to build.
The sites where this matters most are the hip, the spine and the wrist, because those are the ones that turn a stumble into a hospital stay. Stronger bone in those places is what keeps a trip on an uneven footpath as nothing more than a fright and a scraped knee.
Is Jumping Safe for My Bones and Joints?
We understand the hesitation completely. Being told your bones are thinning and then being asked to jump on them sounds, on the face of it, like a poor idea.
We always come back to a measured "risk vs reward" view here, so let's be honest about both sides.
What is the risk of not doing this? Your bones keep quietly giving up density they're not being asked to use. Nothing feels different from one year to the next, which is exactly what makes it so easy to leave alone. Then one ordinary stumble becomes a fractured wrist or hip, and the recovery from that is what really takes your independence.
What is the risk of doing this? Low, provided you start at the right level. Level one is a heel drop with both hands resting on a kitchen bench, which asks very little of your joints. Every level here has a gentler one sitting below it, and there is no prize for skipping ahead.
The motto we keep coming back to is the same one we use for everything: start low, go slow. You should feel a firm jolt travel up through your legs. You should never feel sharp pain.
If you've had a fracture in the past year, a history of spinal fractures, a hip or knee replacement, or severe osteoporosis on a recent scan, have a chat with your physio or doctor before adding impact work in. For almost everyone else, the risk of building up carefully is small.
This guide is for educational purposes only and should not replace specific advice from a medical health professional.
A reminder from our team"The people I see are often quite surprised when I suggest impact work, because they've spent years being told to be careful. What I try to explain is that being careful and doing nothing aren't the same thing. A heel drop with both hands on the bench is very controlled, and your bones still hear it loud and clear. Start there, stay there as long as you need to, and let your body tell you when it's ready for more."
Want to follow along instead of working from a written guide? Our free 55+ Video Series walks you through complete workouts step by step, with our physio team demonstrating every move, every modification and every cue, so you can pick the right version for you.
Watch the Free Video Series →The Three Levels of Impact
Here's the progression, from the most supported version through to full jumps. Our physio team demonstrates all three in the video above.
Start at level one regardless of how fit you feel. This is about giving your joints and muscles time to get used to absorbing force again, and that process can't be hurried. One quick tip before you begin: wear supportive shoes rather than doing this barefoot or in socks.
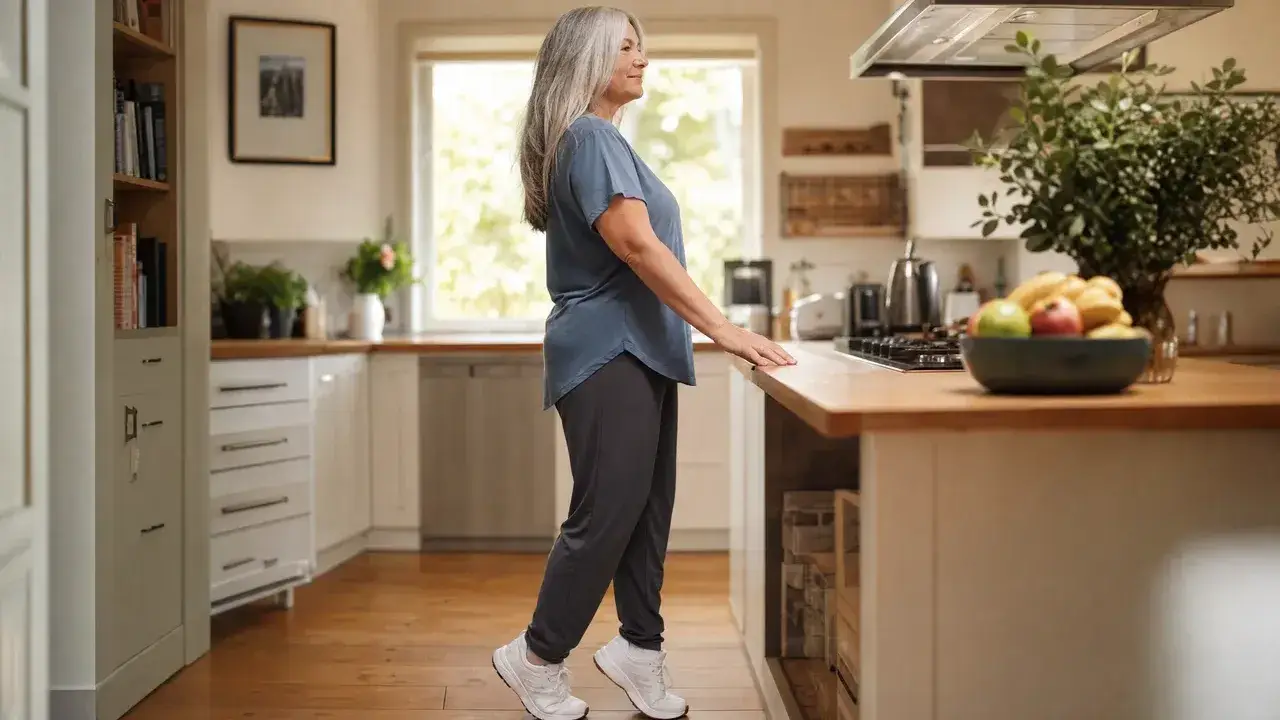
1. The Heel Drop
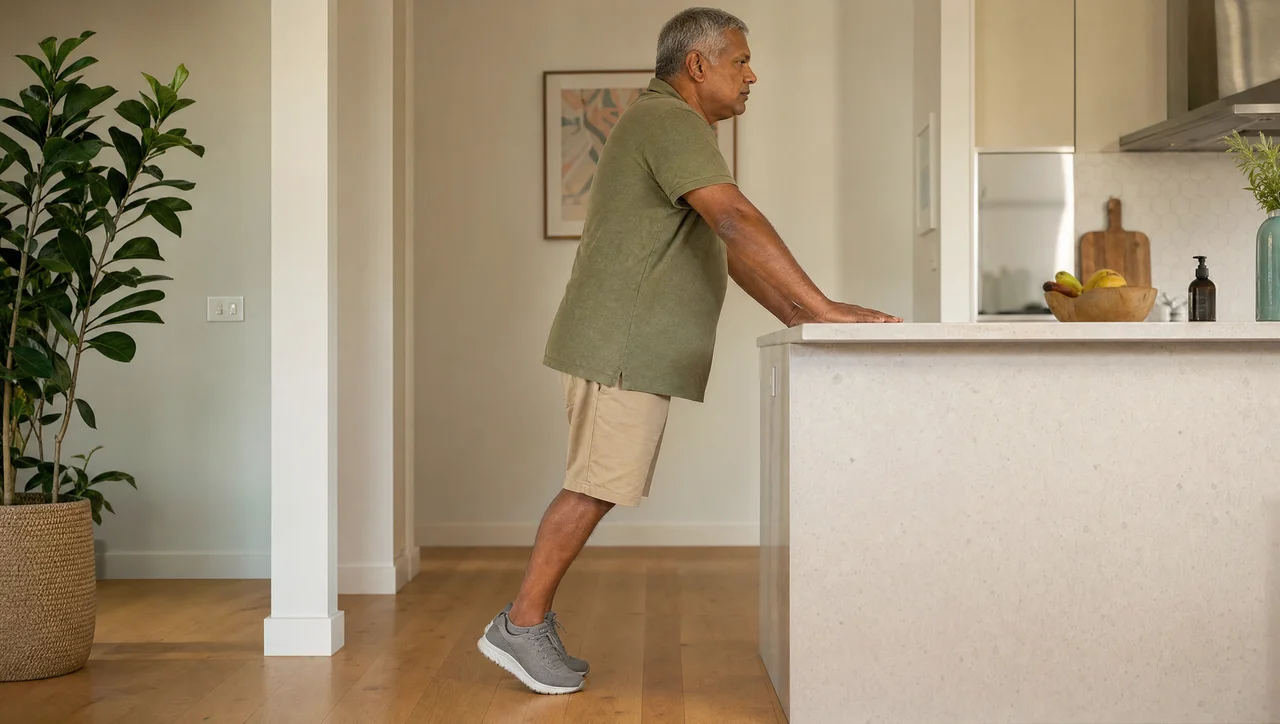
The gentlest way to send that signal, and the right starting point for absolutely everyone. Your hands stay on the bench the whole time, so your balance is never in question.
📺 Watch the heel drop in the video above.
Setup:
- Stand facing a sturdy kitchen bench or benchtop.
- Rest both hands on it at a comfortable height.
- Feet about hip width apart, supportive shoes on.
How to do it:
- Using your hands for support, rise up as high as you can onto your toes.
- Let go and drop. Don't lower yourself slowly, and don't control the descent.
- Let your heels thud into the floor and feel the jolt travel up through your legs.
To adjust: take more weight through your hands if the landing feels too firm, and less as you get comfortable with it.
2. The Supported Jump
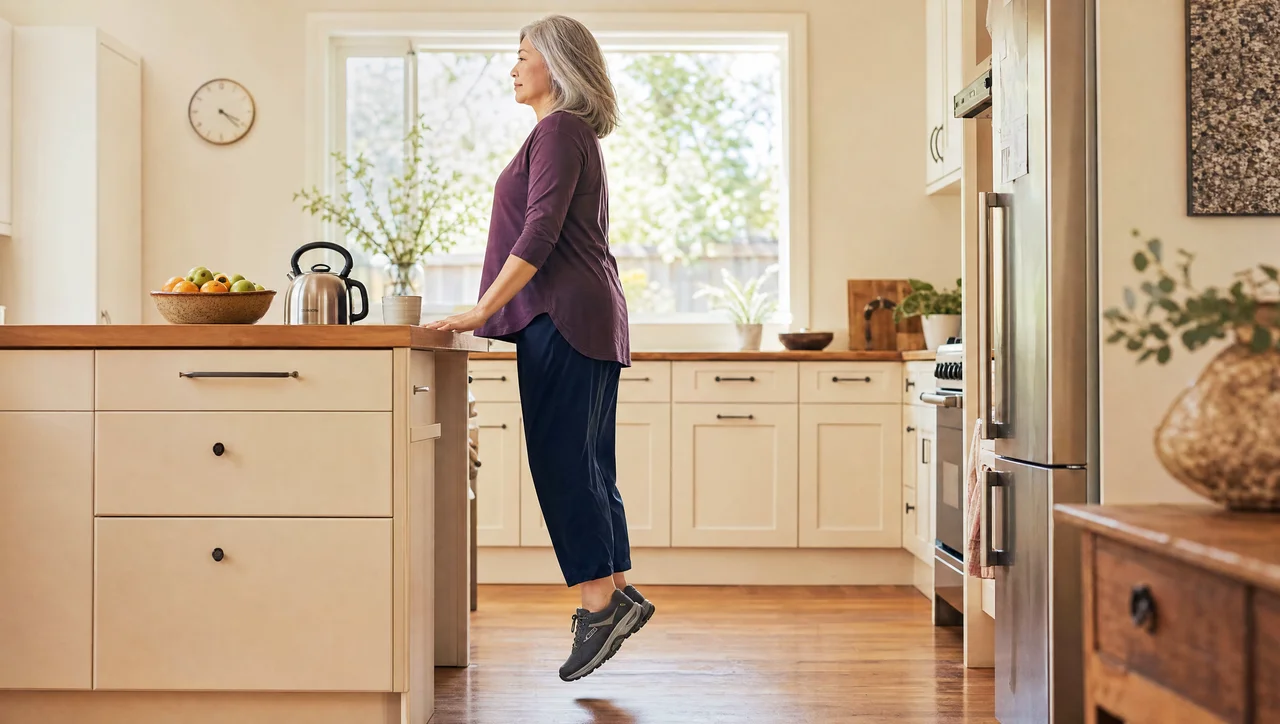
The same idea with your feet actually leaving the ground, which raises the force meaningfully. Keeping your hands on the bench does two jobs at once: it steadies your balance and it takes some of your body weight out of the landing.
📺 Watch the supported jump in the video above.
Setup:
- Same position as the heel drop, both hands firmly on the bench.
- Feet hip width apart.
How to do it:
- Bend your knees into a small dip.
- Push through your legs into a little jump, keeping your hands on the bench throughout.
- Land with that same thud through your heels, with a soft bend in your knees.
To adjust: press down harder through your arms to unweight yourself. Leaning more into your hands can bring the landing down to around half your body weight, which is a very manageable place to start.
3. The Maximum Impact Jump
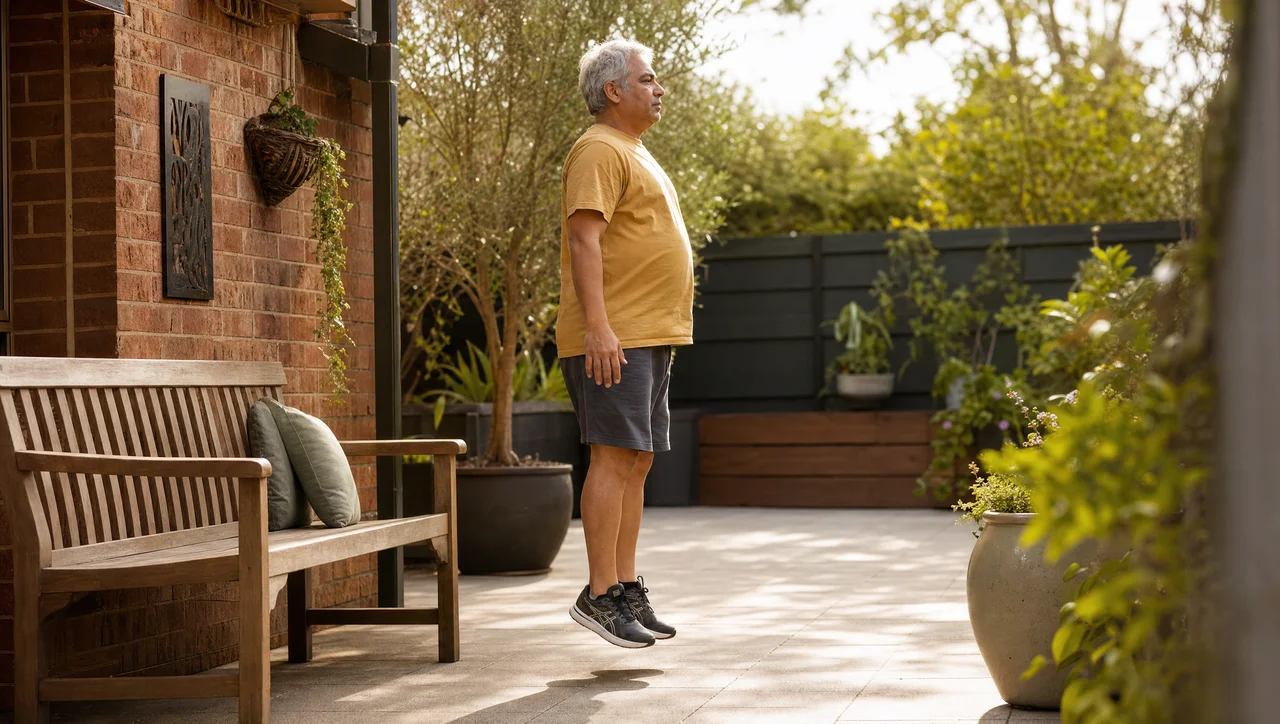
The full version, where your bones take the whole load. This one earns you the most, and it's also the one people reach for far too early.
📺 Watch the maximum impact jump in the video above.
Setup:
- Stand near your bench with your hands hovering just above it if you'd like the option of balance.
- Feet hip width apart.
How to do it:
- Drop into a squat position.
- Jump up, driving through your legs.
- Land on fairly straight legs with only a very slight bend in the knees.
Technique note: resist the urge to land in a deep squat. It feels softer and safer, though what it actually does is let your leg muscles absorb the force before it ever reaches your bones. The whole point is to let that shock wave travel up your skeleton, so a firm landing on nearly straight legs is what you're after.
Safety note: only move here once levels one and two have felt easy for a good stretch of time. Several months at the earlier levels is normal, not slow.
A reminder from our team"Something I say a lot is that your bones don't care how impressive the exercise looks. They only care whether they got the message. I'd far rather someone spend six months quietly doing heel drops by the kettle than jump straight to level three, get sore, and give the whole thing up by week three. Consistency is what shifts bone density, and consistency comes from picking something you can actually keep doing."
Prefer a guided, follow-along routine? If you'd like to build bone strength alongside our physio team, with full demonstrations, pacing and modifications built in, that's exactly what our free 55+ Video Series is for.
Start the Free 55+ Video Series →Putting It All Together
Your bones respond far better to small, frequent bursts than to one long session, which makes this one of the easiest habits to fit into an ordinary week. You don't need a gym, a class, or a spare hour.
A simple way to run your week:
- Start at level one, no matter how fit you are. Heel drops, hands on the bench.
- Do 3 sets of 5 to 10 impacts, a couple of times a week.
- Split them up if it suits you. One set while the kettle boils, another after lunch, a third in the evening all counts the same.
- Stay at your level until it feels genuinely easy, then move up. Months at one level is completely fine.
Done consistently, this is the kind of thing that never announces itself. You won't feel your bones getting denser. You'll simply be better protected the day you catch your foot on something and have to catch yourself.
The Bottom Line
Building bone density at home is entirely possible, and it doesn't take equipment or a great deal of time. It takes the right progression, done regularly, over a long enough stretch to matter.
Bones that are never challenged don't hold steady. They quietly get weaker.
So go and stand by your kitchen bench today and do ten heel drops. Listen for the thud. That sound is your skeleton being handed instructions, and it's one of the most useful things you'll do for yourself all week. 💪
Ready to get started? Our free 55+ Video Series includes complete follow-along workouts featuring bone-building exercises like these, with guidance from our physio team so you can build confidence safely from day one.
Get the Free 55+ Video Series →