
Build Upper-Body Strength Over 50: The Push-Up Progression for Every Level

Ollie - Be Mobile Physiotherapy
Ollie is a physiotherapist at Be Mobile, passionate about changing society's misconception that older adults shouldn't lift weights. He writes most of our articles on strength, balance and confidence for the 55+ community.
Read Ollie's full bio →


A practical guide from the Be Mobile Physiotherapy team on why the push-up is one of the best strength exercises after 50, and how to find the version that's right for you today.
Maybe you've been thinking about getting a bit stronger through the arms and chest lately.
Perhaps you had to push yourself up off the floor recently and it gave you a fright. Perhaps lifting a bag into the overhead locker left your shoulders complaining. Or perhaps the word push-up just brings back memories of school PE and a movement you assume your body left behind years ago.
That's a fair place to start from. Upper-body pushing strength is one of the first things people quietly lose after 50, and it matters far more than most realise.
Here's what we want you to know straight away. The push-up isn't a single exercise you can either do or you can't. It's a staircase, with a step on it for everyone, including you, exactly as you are today.
The ability to push yourself up, off the floor, out of a low chair, up from the side of the bed, is one of the quiet markers of staying independent as we age, and it's built by training the exact pattern the push-up trains.
Let's break it down. First, what a push-up is actually for.
The Push-Up Isn't Just an Arm Exercise
A push-up is a pushing pattern for your whole upper body. Your chest, shoulders and triceps do the pressing. Your abdominals and trunk work to hold you in one straight line the whole way through. Even your wrists and forearms pick up useful load.
There's nothing second-rate about the wall or bench versions, either. They are the same movement pattern at a lighter load through the arms. Same muscles, same benefit, less weight to manage.
That distinction matters, because it means there is no such thing as "not being able to do a push-up." There is only finding the step you start on.
Why the Push-Up Earns Its Place After 50
Here's the part that makes this exercise so valuable. A push-up is really a rehearsal for one of the most important movements you will ever make: pushing yourself back up off the ground.
Think about the moments that strength shows up in real life:
- Getting off the floor after playing with the grandkids, or after a fall.
- Pressing up out of a low, soft couch without needing a hand.
- Lifting a suitcase into the overhead locker, or a box onto a high shelf.
- Getting up from the side of the bed, or pushing a heavy door open.
Every one of those is a push. The muscles that do the pushing, though, are among the first to quietly fade if we stop asking anything of them. The good news is that these muscles respond to being challenged at any age.
Every push-up is a rehearsal for the most important push of all: the one that gets you back on your feet.
Train the push-up, in whatever form suits you today, and you're training the exact strength that keeps you independent tomorrow.
Is This Safe for My Shoulders and Wrists?
We get it. If your shoulders already niggle, or your wrists ache when you lean on them, the idea of loading them up with push-ups can sound like asking for trouble.
We always come back to a measured "risk vs reward" view here. So let's be honest about both sides.
What is the risk of not doing this? Your pushing strength keeps fading. The floor gets a little harder to get up from each year. The overhead locker, the low couch and the heavy door all become a bit more of a struggle, until one day they tip over into a genuine problem.
What is the risk of doing this? Very low, as long as you start at the right level. The wall version asks very little of a sore shoulder. If your wrists complain on the floor, resting your hands on a pair of dumbbells keeps them in a neutral, comfortable position. Every level in this guide has a gentler option sitting below it.
The motto we keep coming back to is the same one we use for everything: start low, go slow. Begin at the level where ten reps are a real effort, but you could do another three or four. Stay there until it feels comfortable. Progress takes time.
This guide is for educational purposes only and should not replace specific advice from a medical health professional.
If you have a recent shoulder or wrist injury, recent surgery, or pain that stops you from leaning through your arms today, get a professional opinion before adding these in. For everyone else, the risk of building up carefully is small.
A reminder from our team"A lot of the people I see feel like the wall version doesn't really count, and I always want to reassure them. The wall push-up is a proper push-up. It's the same movement, just at a level your body is comfortable with today. Stick with it for a few weeks, and you'll often surprise yourself with how quickly the next step starts to feel within reach. There's no such thing as cheating here. You're building real strength, right from the very first one."
Oliver Halliday, 55+ Expert Physiotherapist, Be Mobile Physiotherapy
Want to follow along instead of working from a written guide? Our free 55+ Video Series walks you through a full strength workout step by step, with our physio team demonstrating every move, every modification and every cue, so you can pick the right version for you.
Watch the Free Video Series →The Push-Up Progression: Five Levels
Here's the ladder, from the most supported version through to the full push-up. Start at the level where you can manage around ten reps with the last couple feeling genuinely hard. When that becomes easy, move up a rung. Keep something sturdy nearby, and take your time on each step.
1. The Wall Push-Up
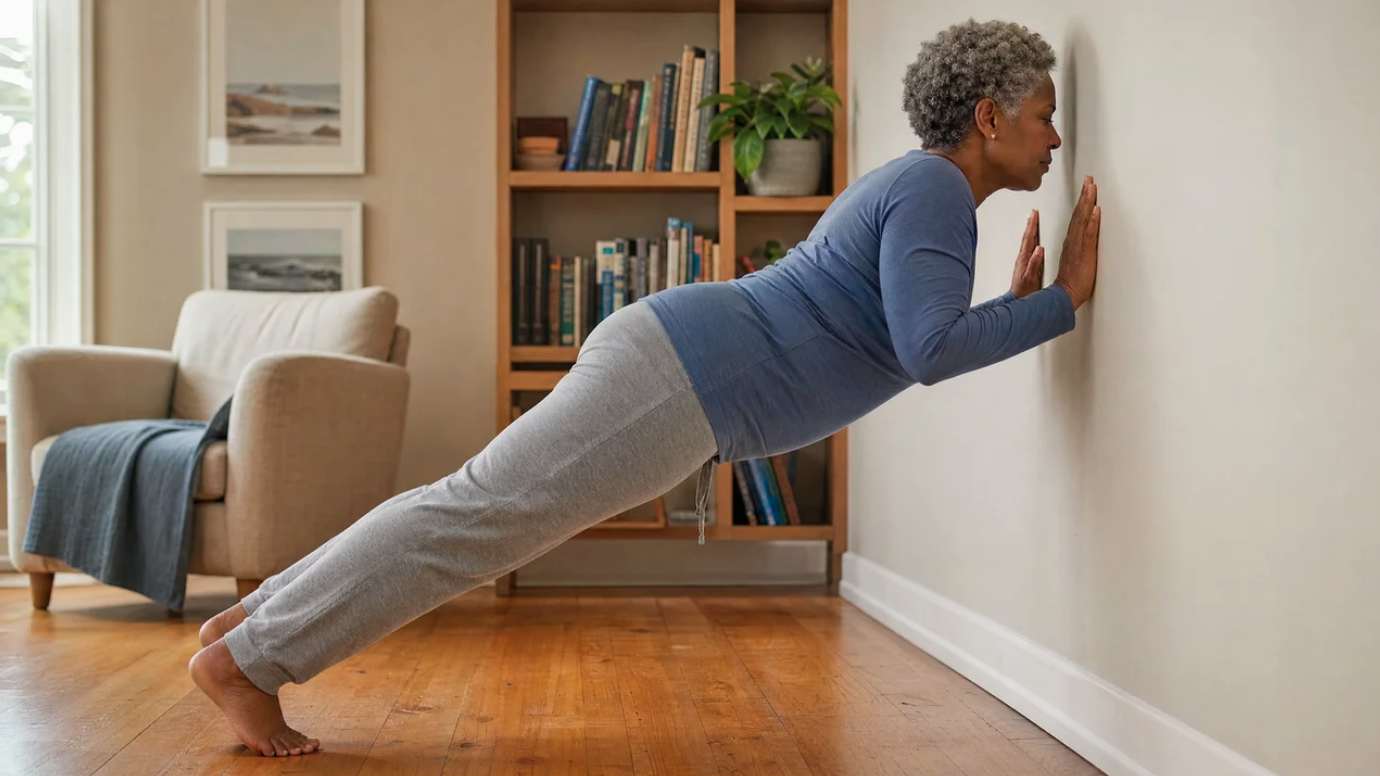
The gentlest version, and the perfect starting point if your shoulders or elbows tend to complain. Don't be fooled by how easy it looks. Done with control, it builds real pushing strength.
Setup:
- Stand a foot or two back from a solid wall.
- Place your hands on the wall at shoulder height and shoulder width.
How to do it:
- Hold your body in one straight line from head to heels.
- Bend your elbows and lower your nose towards the wall under control.
- Press back to the start. That's one rep.
The Dose: 2 to 3 sets of up to 10 reps, with the last rep or two feeling like hard work. 2 to 3 times a week. If ten feels easy, you're ready for the next level.
To adjust: stand closer to the wall to make it easier, further back to make it harder.
2. The Kitchen Bench Push-Up
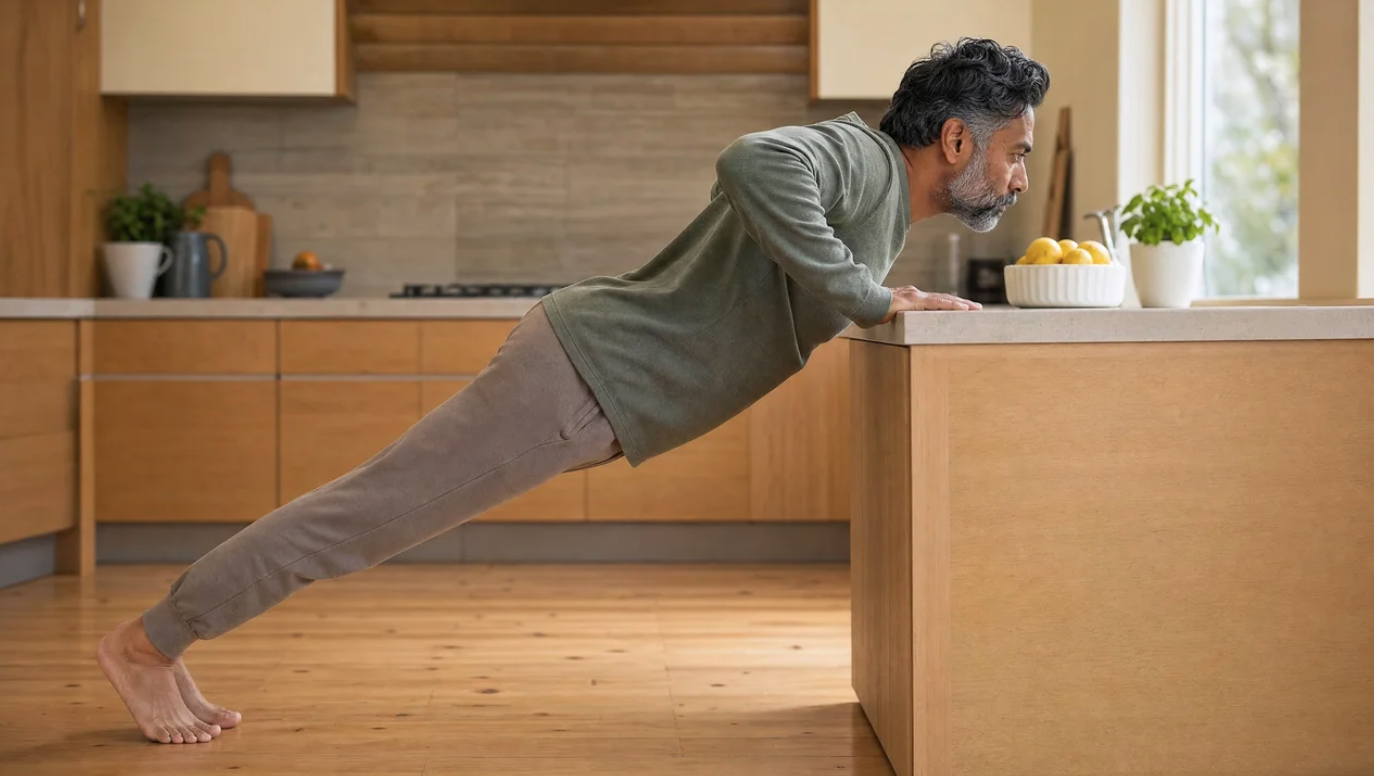
A step up from the wall, using a sturdy kitchen bench or counter. The lower the surface, the harder it gets, so this one bridges the gap nicely between the wall and the floor.
Setup:
- Place your hands on a sturdy bench, shoulder width apart.
- Walk your feet back until your body forms a straight line from shoulder to ankle. You may need to rise onto the balls of your feet.
- Fold a towel over the edge if it digs into your hands.
How to do it:
- Lower your chest towards the bench as your elbows bend.
- Keep that straight line the whole way. Don't let your hips sag or pike up.
- Press back up to the start.
The Dose: 2 to 3 sets of up to 10 challenging reps, 2 to 3 times a week.
3. The Knee Push-Up on a Chair
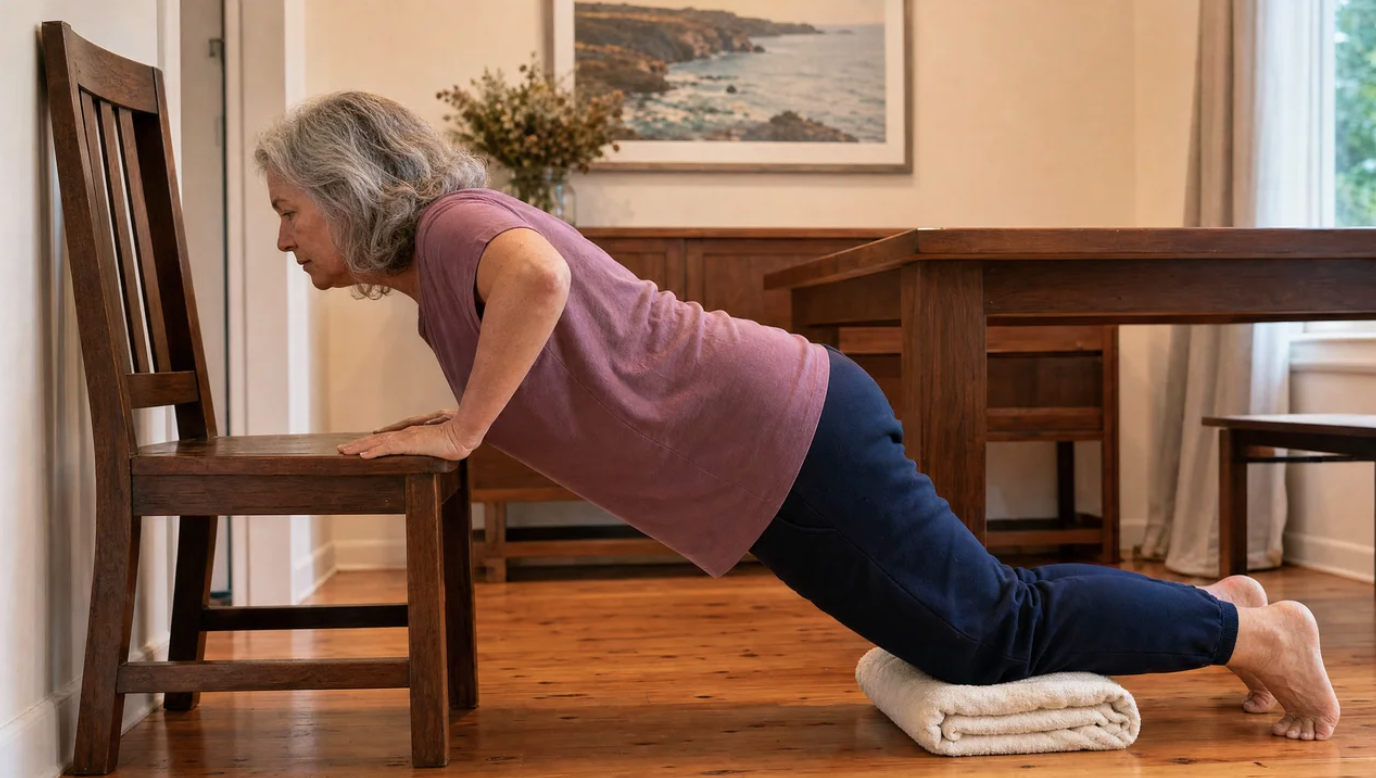
Now we bring the knees down and the body closer to horizontal. Resting on a sturdy chair keeps some of the load off while you get used to pushing from a lower angle.
Setup:
- Kneel on a cushion or folded towel in front of a sturdy chair.
- Place your hands on the seat, shoulder width apart.
How to do it:
- Hold a straight line from your knees to your shoulders.
- Lower your chest towards the seat as one unit. The whole body moves forward together; don't leave your hips behind.
- Press back up.
The Dose: 2 to 3 sets of up to 10 challenging reps, 2 to 3 times a week.
Safety note: make sure the chair is stable and won't slide. Pushing it back against a wall is ideal.
4. The Knee Push-Up on the Floor
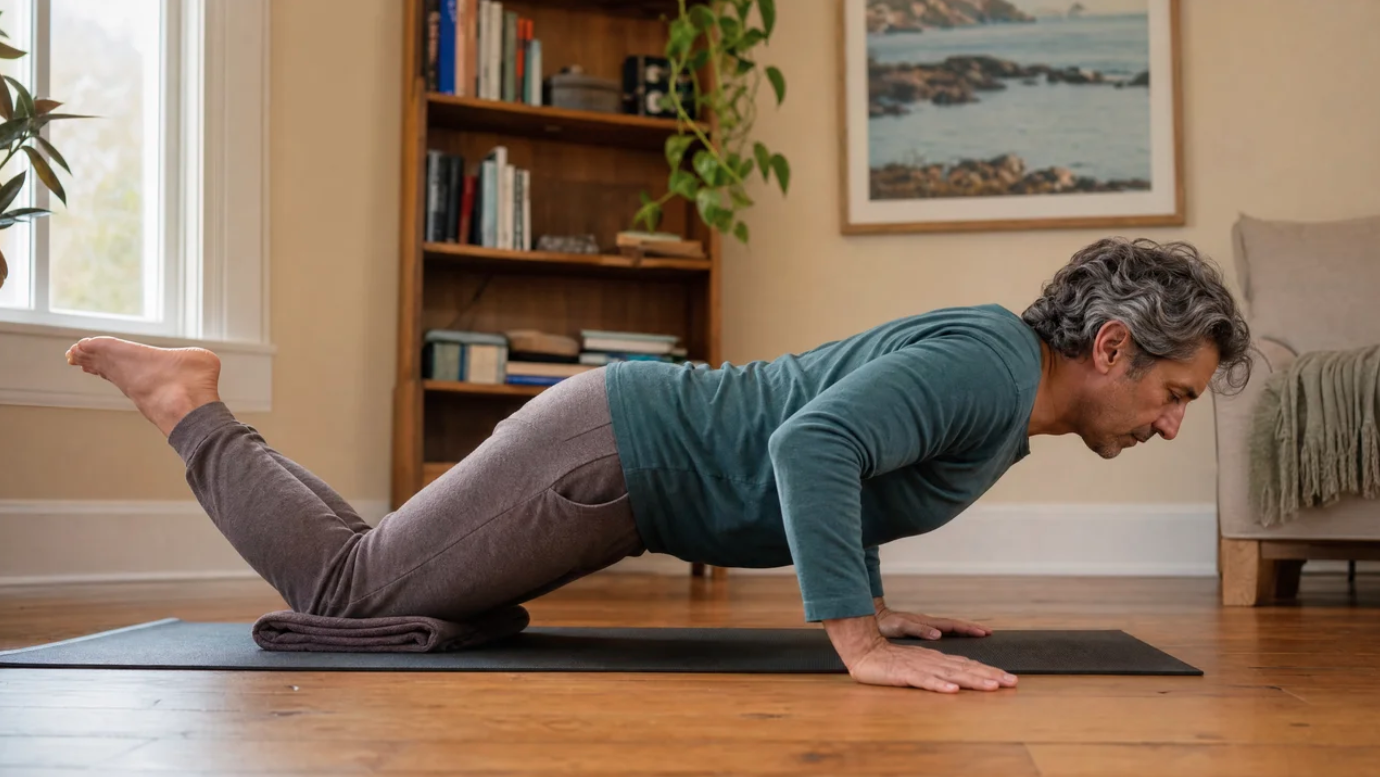
The same movement as the chair version, now down on the floor. Being more horizontal means more of your weight travels through your arms, so it's a genuine jump in difficulty.
Setup:
- Kneel on a mat or folded towel.
- Place your hands on the floor, slightly wider than shoulder width.
How to do it:
- Straight line from knees to shoulders, hips tucked under.
- Lower your chest towards the floor as one unit.
- Press back up with control.
The Dose: 2 to 3 sets of up to 10 challenging reps, 2 to 3 times a week.
To adjust: if your wrists ache pressing flat on the floor, grip a pair of dumbbells and push up from those instead. It keeps your wrists in a neutral, more comfortable position.
5. The Full Push-Up
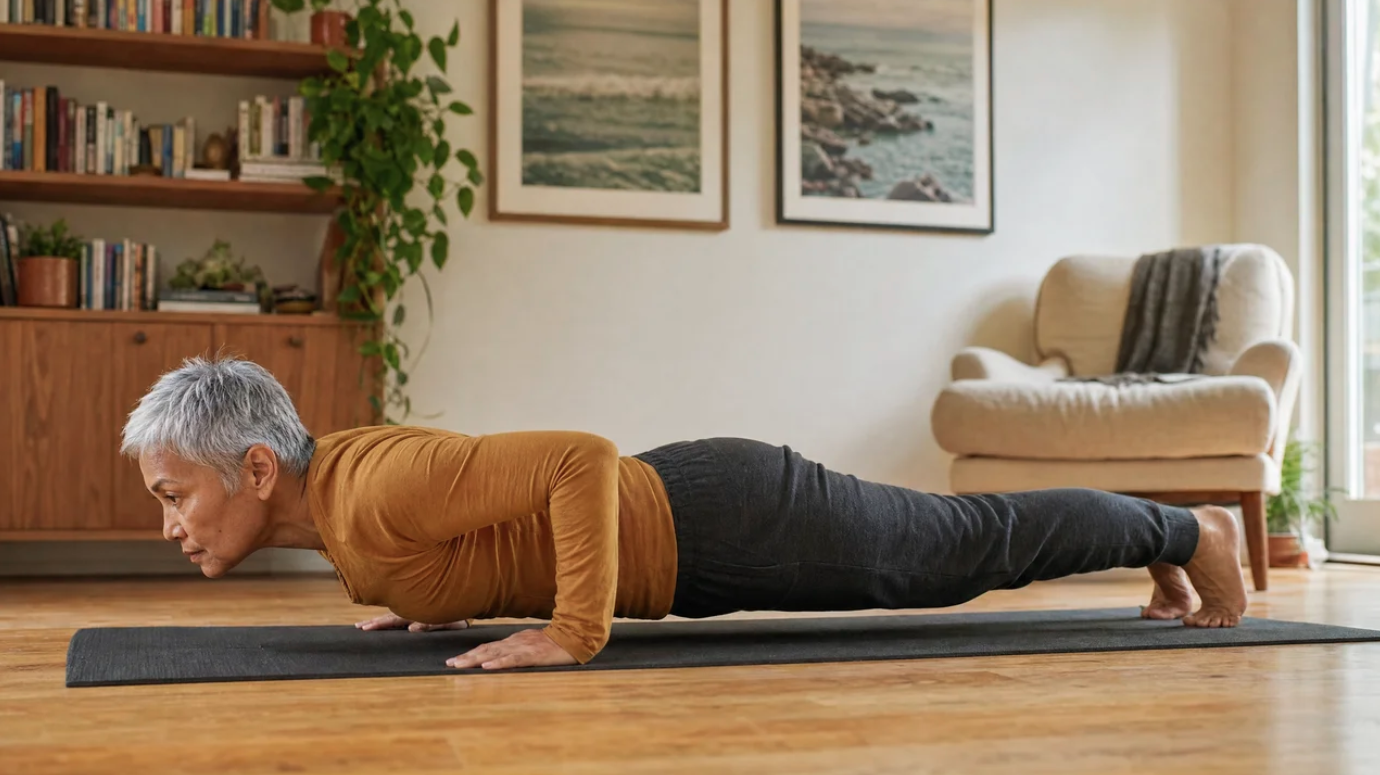
The hardest variation. On the balls of your feet, straight line from your shoulders to your heels, moving as one solid unit. Reaching this is a real milestone worth being proud of.
Setup:
- Hands on the floor, slightly wider than shoulder width.
- Legs straight out behind you, up on the balls of your feet.
How to do it:
- Brace your abdominals so your body holds one straight line, like a plank.
- Lower your chest towards the floor.
- Press back up without letting your hips sag or lift.
The Dose: 2 to 3 sets of up to 10 challenging reps, 2 to 3 times a week.
A reminder from our team"If there's one thing I gently encourage, it's not to rush. It's tempting to skip ahead a few levels, though that usually just leads to sore shoulders and a bit of frustration. Find the level where ten reps feels like a real effort with nice clean form, and let yourself settle there for a couple of weeks. When you feel ready, move up. Slow and steady really does win this one."
Oliver Halliday, 55+ Expert Physiotherapist, Be Mobile Physiotherapy
Prefer a guided, follow-along routine? If you'd like to build strength alongside our physio team, with full demonstrations, pacing and modifications built in, that's exactly what our free 55+ Video Series is for.
Start the Free 55+ Video Series →Putting It All Together
You don't need a gym or a spare hour for this. A few minutes, two to three times a week, is enough to start building real pushing strength.
A simple way to run your week:
- Pick your level: the version where ten reps is a proper effort but you could do a few more.
- Do 2 to 3 sets, 2 to 3 times a week, with a rest day in between where you can.
- Retest every couple of weeks. When ten reps feels comfortable, move up one rung.
Done consistently, the changes show up in ordinary moments. Getting off the floor without thinking about it. Pressing out of a low chair with no hands. Lifting the case into the overhead locker like it's nothing.
The Bottom Line
Strength through your chest, arms and shoulders does far more than change how you look. What it really protects is the power to push yourself up, off the floor, out of a chair, back onto your feet, for as long as you possibly can.
The push-up trains this better than almost anything, and it costs nothing but a wall and a few minutes.
The strength to get yourself back up isn't a luxury, it's a necessity. Protect it while you can.
So start where you are. Have a crack at the wall version today. Move up a rung only when the last one feels easy. Your future self, pushing up off the floor well into their later years, will be glad you did. 💪
Ready to get started? Our free 55+ Video Series includes complete follow-along workouts featuring strength exercises like these, with guidance from our physio team so you can build confidence safely from day one.
Get the Free 55+ Video Series →